
Hello, WordPress lovers! In today's blog post, I am showing you how to add custom fonts to your WordPress website.Today’s tutorial is part of our series Master WordPress.Here’s an overview of all blog posts from this series:
How to set up and customize menus in WordPress
How to add custom fonts to WordPress (this post)
WordPress sidebar design- best practices
How to set up an online shop on WordPress
Fonts are an important part of your website's design and can help you perfect your overall branding experience. Each WordPress theme comes with a different layout and design options, but more often than not, you have a pre-defined font. There's an easy way to change it. Follow my step-by-step guide below to add custom fonts to your Wordpress website.Note: For the purposes of this tutorial, we will be using a free plugin which makes use of Google Fonts. Google Fonts is a free service offered by Google, which gives you access to hundreds of free custom fonts. Most website developers use Google Fonts as they are reliable and, well, you don't need to pay anything! ;) If you want to use fonts that are not part of the Google Fonts library, then this tutorial is not for you.
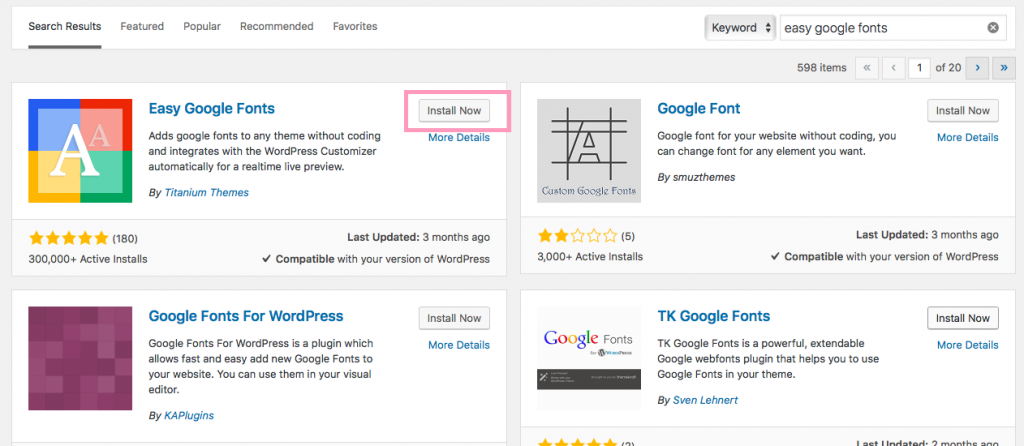
Step 1: Download the Easy Google Fonts plugin
While there are several different ways of adding Google fonts, the easiest way for a non-coder is to add them using a plugin. My favorite plugin is called Easy Google Fonts. I love this plugin, not only because it's easy to use, but because it comes with tons of features like real-time preview, custom font controls, possibility to group fonts together, and much more. Best of all- it doesn't require ANY coding skills. Yay!Log into your WordPress Dashboard and go to Plugins > Add New. After that, type in Easy Google Fonts in the search bar. Locate the plugin and click on Install Now. After that, activate it.
Step 2: Create a font control
In your Dashboard, go to Settings and locate Google Fonts. After clicking on it, you should see the following window:

Start by creating a new "font control". You can name it however you want. After that, click on Create Font Control.
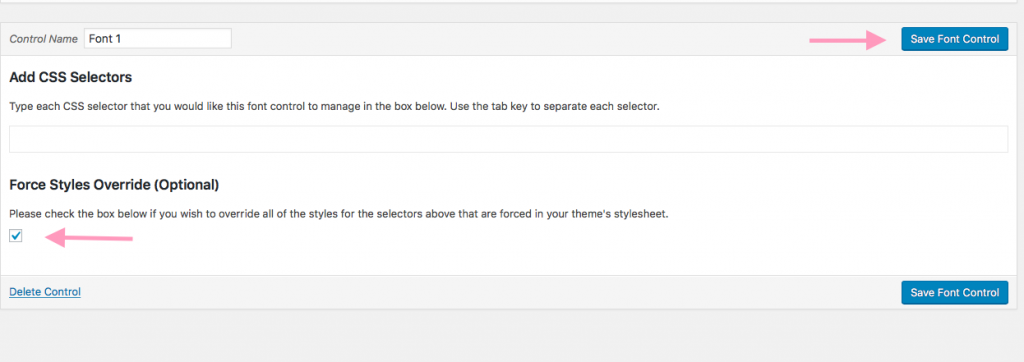
Make sure to check the Force Styles Override option, which will basically make your WordPress theme use the fonts you define in this plugin.
Step 3: Customize the fonts on your website
Go to Appearance > Customize from the main dashboard. The customization panel will appear. You will notice the plugin has added a new customization option called Typography.

Click on it in order to explore all settings. Since the plugin offers a real-time preview, you can play around with the fonts and see which combination you like best.Here's how I would change the blog post headlines for Lipstick and Pixels:
BEFORE CUSTOM FONTS

AFTER CUSTOM FONTS

In addition, you can specify the font weight, add text-decoration, and a bunch of other features. You should feel free to experiment with all those features in order to achieve the results that you are looking for.One last thing I want to point out is that there are multiple tab controls for each font style. Make sure to check out the Appearance section where you can change the color of the fonts!

From this panel, you can adjust the font size, line height, and the letter spacing of the fonts used. You can preview every single feature and nothing will get saved until you click on Save & Publish button at the upper left corner.In case you want to go back to the default theme settings, simply click on the Reset text button.
Final thoughts:
If you don't have any coding skills and want to change the look and feel of your WordPress website within a few minutes, this might be the fastest and easiest way! However, Warning: I don't recommend using more than 2 different font styles on your website. It will not only make your website look messy but might also slow it down ( and we most certainly don't want that)!
I hope you enjoyed today's tutorial! If you did, I would love it if you share this post with your friends 💖